The term green thumb is often used to describe someone who seems naturally good with plants — beautiful garden beds, thriving window boxes, perfect patio pots.
If you’re like many people, you may have felt intimidated by those “green thumb” friends. Maybe you joke that you have a black thumb because everything you touch dies. But that idea doesn’t hold up.
Because you do have a green thumb.
Everyone does.
The term green thumb wasn’t originally about talent at all. It referred to people who cared for so many pots that their thumbs were stained green from algae and moss. The green wasn’t a gift — it was a sign of time, attention, and experience.
Gardening has never been about perfection.
It’s about participation.
Using your hands. Paying attention. Letting nature do what it does best.
The Grow With Me Project is designed to help you cultivate your own green thumb — an experience I truly wish for everyone. There’s nothing quite like the moment you can say, “I grew that… from seed.”
You’ll work with real seeds, real soil, and real growth. You’ll learn what germination looks like, why plants need space, how to tell when water is needed, and what it means to support growth rather than control it.
The 2026 Backyard Bees Grow With Me Project begins in May. Together, we’ll grow three plants from seed to create one beautiful patio pot.
And remember:
This isn’t about perfection.
It’s about practice.
Everyone has a green thumb.
You grow it by using it.
Let’s grow something — together.
Table of Contents
What This Project Is
You can think of the Grow With Me Project as an experiment in growing, an exploration of how plants work, or a distance-learning experience you can do right at home.
What makes it different is its tone. This project is designed to be uplifting, positive, and welcoming — especially for people who feel unsure, inexperienced, or even a little embarrassed to call themselves “gardeners.”
We’ll break the process into clear, manageable steps, demystify a few common gardening terms, and grow a lush patio pot together. The word perfect is intentionally flexible here — you get to define what success looks like. Our goal is simple: a pot that is green, alive, and blooming through the end of the growing season (September–October on Long Island).
Starting in May, you’ll be supported through weekly emails that offer small actions to take, ways to check in on your plants, and guidance on what to expect next. By summer, the hope is that you’ll be enjoying fuzzy Teddy Bear sunflowers in bloom, fragrant Thai basil, and jewel-toned nasturtiums brightening a doorstep, patio, or terrace — wherever you choose to place it.
If you’re curious about other easy, pollinator-friendly flowers beyond this project, I also shared The Queen Bee’s Favorite Flower Seeds for Bee-ginner Gardeners — a simple, beginner-friendly list of seeds the bees truly love.
Either way, gardening isn’t about perfection.
It’s about practice.
And again — you define success.
We’ll help you get there.
What You’ll Grow
One of the great joys of growing plants from seed is discovering their diversity. There are over 10,000 varieties of tomatoes in the world, and if you have the seed, you can grow varieties like Green Zebra or Purple Krim — flavors and colors rarely found in the produce aisle.
Even the best nursery can only stock so much. Growing from seed gives you access to plants chosen for beauty, character, and experience — not just convenience.
In the Grow With Me Project, you’ll grow three plants. From the moment you open each envelope, you’ll begin to notice how much variety the single word seed doesn’t quite capture.
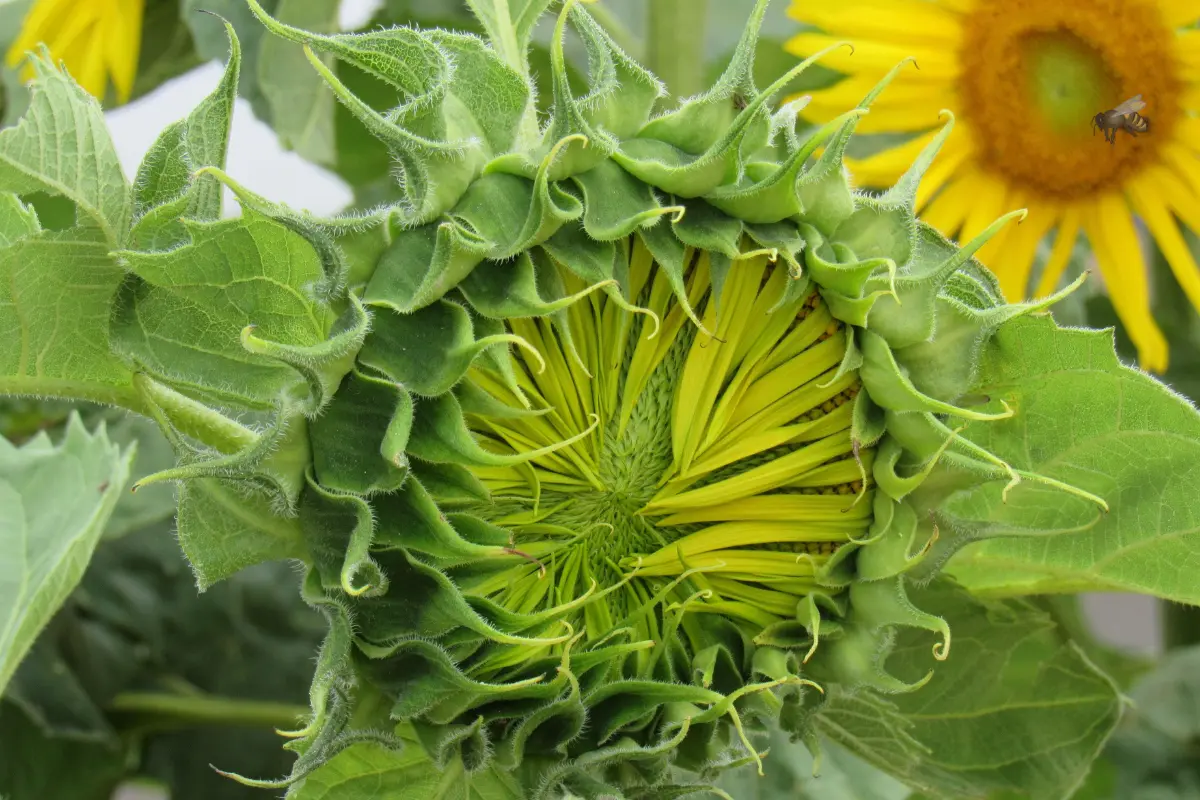
The centerpiece of your patio pot will be a cheerful, dwarf sunflower. The Teddy Bear Sunflower is shorter than the towering sunflowers you may be familiar with and perfectly suited for containers. Its soft, fuzzy blooms are impossible not to touch, and you’ll likely smile every time you see it.
You’ll also grow Jewel Nasturtiums, an edible flowering plant known for its bold yellow, orange, and red blooms that spill gracefully over the edge of a container. Nasturtiums are often used as salad garnishes, where their color really pops against dark greens, or simply enjoyed for their old-fashioned charm.
The smallest seeds in the project belong to Thai basil, a fragrant herb with purple stems and deep green leaves. Thai basil is a wonderful teacher. You’ll learn how pinching encourages bushier growth, and even if you never cook with it, the soft, spicy scent released when you brush past the leaves is reason enough to grow it.
This project isn’t about creating a pollinator meadow — but if all goes well, your pot will offer a small resting place for bees and other pollinators passing through. A pause. A sip. A little nourishment before they head back to work.
There are many small experiences waiting for you here.
Each one matters.
We’re not aiming for garden perfection.
We’re aiming for something alive, thriving, and yours.
What You’ll Need
You don’t need anything fancy — just a few basics that support success.
Pot with drainage holes + saucer
We use an 18″ pot (sometimes labeled as a 15-gallon pot) with built-in drainage and a matching saucer. You don’t need this exact size — aim for something roughly 18″ wide and deep enough to support root growth and hold nutrients for multiple plants.
Potting mix
Potting mix is designed specifically for containers and takes much of the guesswork out of watering and root health. Read the label and choose something labeled potting mix (not garden soil). As your confidence grows, you can experiment — but simple works best.
Light + water
You can’t control the sun, but you can control where you place your pot. Keep it in a sunny spot and water so the soil stays moist, not dripping — damp enough to hold together if you pinch it. One of the benefits of growing in a pot is flexibility: if it needs more (or less) sun, you can move it.
Highly recommended: squirrel protection
Squirrels love freshly disturbed soil. A piece of window screen or chicken wire placed over the pot allows sunlight and water in, but keeps curious diggers out. Once seedlings are established, you can remove it.
A note on sourcing
You don’t need to shop anywhere specific. Look around, ask neighbors, visit garage sales or thrift shops, or repurpose what you already have. What matters most is space for roots, good drainage, and your willingness to try.
Two Ways to Begin
Gardening instructions often sound like this: “Start indoors 6–8 weeks before last frost. Transplant after danger of frost has passed.”
That kind of language can feel discouraging — and unnecessary. We don’t want to do that to you. At the same time, we do want you to feel confident trying new things when you’re ready.
So here are two simple options.
Option A: Direct Sow (Easiest)
Direct sowing means planting seeds directly into the pot where they’ll grow. This is the easiest approach, and it’s what our instructions are based on. You can plant all three seeds directly into your patio pot using the diagram and suggestions we provide.
Option B: Optional Head Start (Thai Basil Indoors)
We include plenty of seeds, which means there’s room to experiment if you’d like. If you’re curious, you can try starting a few Thai basil seeds indoors for an earlier harvest. Many gardeners do this to extend the season — but it’s completely optional.
If you want to try:
- Fill a small 3″ pot (or a cleaned yogurt cup with drainage holes) with moist potting mix or seed-starting mix
- Drop in 2–3 Thai basil seeds and lightly cover with soil
- Keep the soil moist and the container warm
Within about a week, you should see growth. Once the weather warms in May, you can transplant your basil into the patio pot. If you skip this step, you’re still right on track.
Planting the Pot
This is where everything comes together — and it happens more quickly than you might expect.
Bring all your supplies together in one spot. You can be fancy and use a potting table, wear a hat, and sip some lemonade — or simply find a place where it’s okay to spill a little dirt or leave a muddy smudge.
Before you plant, you want your soil to be evenly wet from the top to the bottom of the pot. A simple gardener’s trick is to pre-soak your potting mix by adding water directly to the bag and mixing it until the soil is damp and workable — not dry, and not sloppy.
Once your pot is filled and your soil feels right, you’re ready to plan your layout.
This project uses a classic patio-pot approach: thrill, fill, and spill.
- Teddy Bear sunflowers are the thrillers — the cheerful centerpiece
- Thai basil is the filler, growing around the sunflower’s stem
- Nasturtiums are the spillers, trailing over the edge of the pot
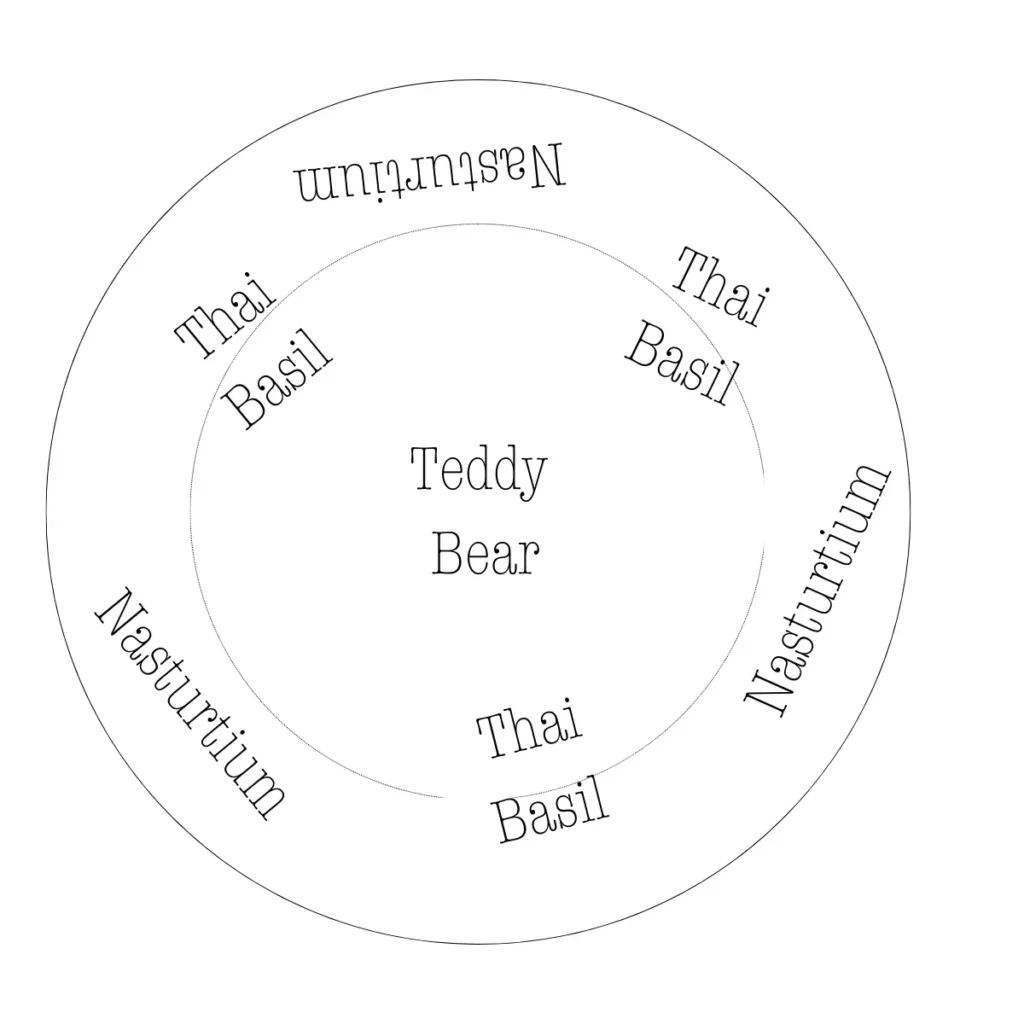
Use the diagram above to see how everything fits together.
The Grow With Me Project Planting Recipe
Use the diagram as your guide:
- Sunflower: 2–3 seeds in the center
- Thai basil: 3 seeds in each spot
- Nasturtium: 1 seed in each spot
For spacing, aim for balance rather than a ruler. Basil grows best set a little in from the edge (about 2 inches), while nasturtiums are happiest closer to the rim (about 1½ inches).
When planting depth matters, use your hands as a guide: sunflowers go deeper (about one knuckle), while basil and nasturtiums stay shallow (about one fingernail).
Once the seeds are in place, gently cover them with soil and lightly press down. Check the moisture by poking your finger into the soil — it should feel damp below the surface. You’re aiming for moisture throughout the pot, not puddles.
Before you walk away, protect your pot. Freshly planted soil is irresistible to squirrels, and they can undo your careful work in minutes. Place a piece of window screen or chicken wire directly over the surface of the pot. Sunlight and water can pass through, but digging paws cannot.
Once your seedlings are established and sturdy, you can remove the screen — but at the beginning, this step matters.
After planting, resist the urge to fuss. Place your pot in a sunny spot and let the seeds do their quiet work underground. Germination doesn’t happen all at once — some plants will appear sooner than others — and that’s exactly how it should be.
At this stage, patience is part of the process.
What to Expect After Planting
Nature has its own pace — sometimes excruciatingly slow, and other times surprisingly fast.
You’ve done your part. Now it’s time to watch (and make sure the soil stays moist). Waiting can be hard, but the anticipation is worth it — because underground, seed magic is happening.
As each seed absorbs moisture in the cozy environment you created, its outer coat softens. Roots begin to grow downward, anchoring the plant and pulling in water and nutrients. Strong roots allow the seedling to push against the weight of the soil and eventually emerge into the light.
It’s pretty miraculous.
You’ll often see Thai basil appear first, followed by sunflowers, with nasturtiums taking the longest. This timing can vary depending on temperature and moisture — and that variation is completely normal.
If nothing appears in the first five days, don’t worry. Keep the soil moist (remember: no puddles) and keep watching. You may notice a small bump or irregularity in the soil where you planted — that’s a tiny plant working hard to break through.
Within 7–10 days, you’ll likely have visible growth and something to celebrate.
Stage one of your success has officially begun.
Caring for Your Pot
Nature will continue to do most of the work — unfolding leaves, forming buds, and turning seeds into plants. You don’t need to manage that transformation.
Your part is presence. This is where your green thumb takes shape — through watching, responding, and spending time with something alive. The more you notice, the more capable you’ll feel.
In addition to watering, there are three ways you’ll support your pot as it grows.
Thinning (about 2–3 weeks after planting)
It’s time to thin your seedlings once you see a sturdy stem and a second set of leaves — called true leaves — that resemble the mature plant. This usually happens when seedlings are a few inches tall.
Thinning matters because plants that grow too close together compete for water, nutrients, and space. We planted extra seeds at each spot on purpose — now you get to choose the strongest plants to keep.
Using a pair of scissors, snip the weaker seedlings at the soil line. Don’t pull them out — cutting avoids disturbing nearby roots.
After thinning, you should have:
- 1 sunflower
- 3 basil plants
- 2–3 nasturtiums
Do you have to thin your plants?
Yes. This step makes a noticeable difference in the health, balance, and beauty of your pot.
Pinching Basil (about 6–8 weeks)
Pinching people can hurt. Pinching plants can help.
Basil benefits greatly from having the top of its main stem pinched back. When the plant reaches about 6–8 inches tall and has several sets of leaves, use your fingers or scissors to pinch off the top growth just above a leaf pair.
This encourages side branches to grow, keeping the plant shorter, bushier, and fuller. For a patio pot, that means a more balanced look — and more leaves to enjoy.
Do you have to pinch your basil?
No. But unpinched basil tends to grow tall and leggy, which can throw off the balance of your pot.
Deadheading Nasturtiums (as flowers fade)
Deadheading sounds dramatic, but it’s simply the act of removing spent flowers so the plant can focus its energy on producing new blooms.
Once your nasturtiums begin flowering, watch for blooms that are fading or wilting. Gently pinch the flower off where it meets the stem — it should come away easily.
Do you have to deadhead your flowers?
No. But regular deadheading encourages longer blooming and keeps your pot trailing with color throughout the season.
A Final Note
None of these practices require perfection. They’re about observation, timing, and small actions that support healthy growth.
You’re learning to work with your plants — not control them.
That’s the green thumb effect in action.
A Gentle Gardening Glossary
This project introduces a few gardening terms along the way. Here’s what they mean — simply and without pressure.
Green Thumb
Not a talent you’re born with. A green thumb grows through time, care, and attention. It’s the result of showing up, noticing changes, and gaining experience.
Germination
The moment a seed wakes up. When conditions are right, the seed absorbs water, sends roots downward, and begins pushing toward the surface.
Cotyledons
The very first leaves a seedling produces. These don’t look like the adult plant — they’re temporary and help the seedling get started.
True Leaves
The next set of leaves that appear after the cotyledons. These do look like the mature plant and signal that the seedling is ready to grow more vigorously.
Thinning
Removing extra seedlings so the strongest plants have enough space, water, and nutrients to thrive. It’s an act of care, not loss.
Pinching
Removing extra seedlings so the strongest plants have enough space, water, and nutrients to thrive. It’s an act of care, not loss.
Deadheading
Removing faded flowers so the plant can focus its energy on producing new blooms instead of seeds.
Moist (Not Wet)
Soil that feels damp and holds together when pinched, but doesn’t drip or puddle. Roots like air as much as they like water.
Thrill · Fill · Spill
A simple way to design a patio pot:
- Thrill: a tall focal plant
- Fill: plants that fill in around it
- Spill: plants that trail over the edge
Growing Together (How Support Works)
The Grow With Me Project was designed to meet you where you are. Some people thrive with a little structure and reassurance, while others prefer to grow quietly, checking in when it feels right. Both approaches are welcome here, and both can nurture your inner green thumb.
For those who want ongoing encouragement, the Grow With Me Complete Project offers a shared growing rhythm. Along with the seed trio and printed guide, participants receive gentle weekly emails throughout the season — ten weeks of small check-ins that help answer the question, “Is this normal?”
The Complete Project also includes a handmade calendula comfrey salve — a quiet companion for hardworking hands, and a reminder that tending plants and tending ourselves often happen together.
There’s no requirement to start on a specific day. Late starts are welcome. Gardening isn’t a race, and this experience is intentionally flexible.
If you prefer a quieter path, the Self-Guided option offers the same seed trio and printed grow guide, without the weekly emails. The guide is designed to stand on its own — offering clear, practical support for planting, care, and what to expect as the season unfolds.
Closing
This isn’t about perfection.
It’s about practice.
Everyone has a green thumb.
You grow it by using it.
Let’s grow something — together.